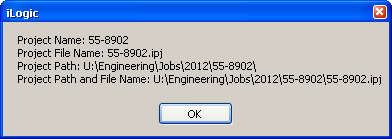
Quantcast
Channel: From the Trenches with Autodesk Inventor
Viewing all 61 articles
Browse latest View live

Ilogic - Add Standard Virtual Parts From a Text File

$
0
0


Issue:
You have a number of standard Virtual parts that you find yourself adding over and over. You'd like to have the ability to add them based on a predefined list.


Solution:
Here is an example iLogic rule that will read a *.txt file and present the contents to the user in an input box list. The user is then asked to enter a quantity for the virtual part, and then the virtual part occurrences are added to the assembly. If one or more occurrences of the virtual part exist in the assembly, the iLogic rule deletes them and just adds back the total number needed.

(update: see also iLogic - Add Standard Virtual Parts From an Excel File or a similar solution)

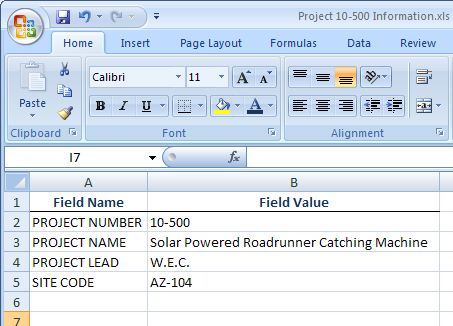
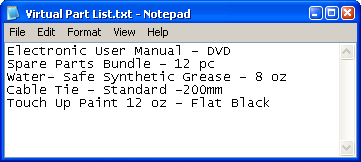
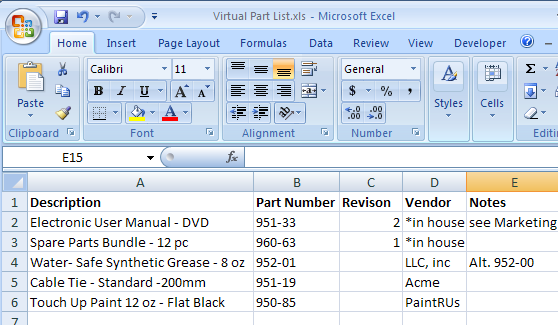
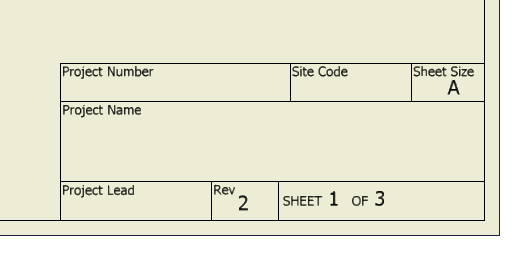
An example text file list

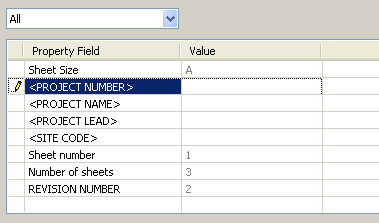
The list presented to the user in an input list box.

 
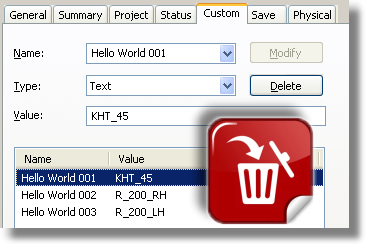
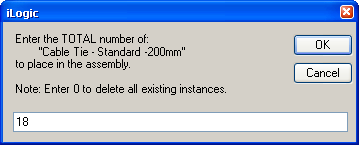
The input box presented to the user to set the quantity.

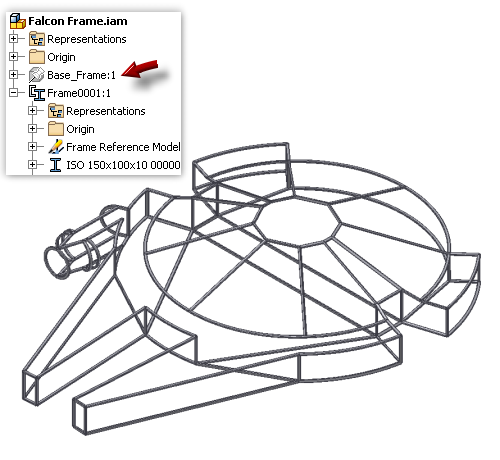
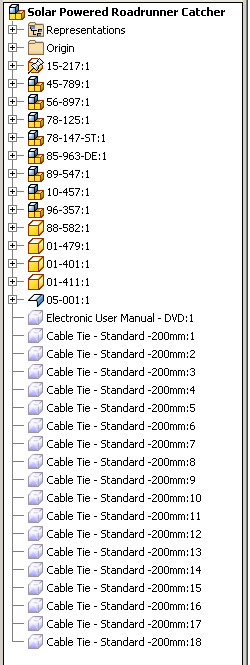
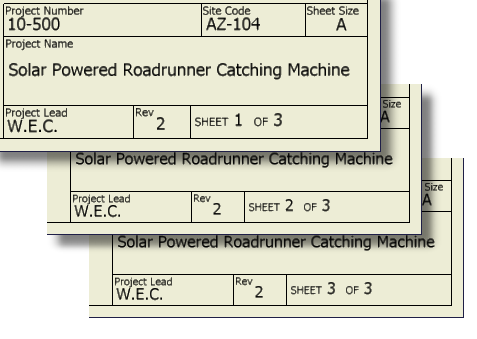
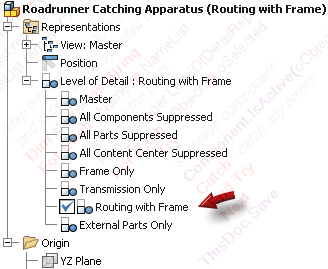
The virtual parts added to the assembly.

Adjusting the quantity.

The iLogic rule deletes the original 18 occurrences and just adds back the number specified.
 Here is the example iLogic rule:
(special thanks to Brian Ekins for the code he posted at this link.)


Imports System.IO
'open and read a text file
Dim oRead As New StreamReader("U:\iLogic examples\Virtual Part List.txt")
Dim sLine As String = ""
Dim MyArrayList As New ArrayList

'build list from text file
Do
    sLine = oRead.ReadLine()
    If Not sLine Is Nothing Then
        MyArrayList.Add(sLine)
    End If
Loop Until sLine Is Nothing
oRead.Close()

'get user input from list
sVirtPart = InputListBox("Select a virtual part to add.", _
MyArrayList, MyArrayList.Item(0), "iLogic", "Standard Virtual Parts")

'check for empty input
'in the case where the user
'cancels out of the input box
If sVirtPart = ""Then
Return 'end rule
Else
End if

'get quantity from user
iQTY = InputBox("Enter the TOTAL number of:"_
& vblf & "        ''"& sVirtPart & "''"_
& vblf & "to place in the assembly."_
& vblf &  vblf & "Note: Enter 0 to delete all existing instances.", "iLogic", "1")

'check for empty input
'in the case where the user
'cancels out of the input box
If iQTY = ""Then
Return 'end rule
Else
End if

'define assembly
Dim asmDoc As AssemblyDocument
asmDoc = ThisApplication.ActiveDocument
'define assembly Component Definition
Dim oAsmCompDef As AssemblyComponentDefinition
oAsmCompDef = ThisApplication.ActiveDocument.ComponentDefinition

'Iterate through all of the occurrences in the assembly
Dim asmOcc As ComponentOccurrence
For Each asmOcc  In oAsmCompDef.Occurrences
                'get name of occurence only (sees only everything left of the colon)
                Dim oOcc As Object
            oOcc = asmOcc.name.Split(":")(0)
            'look at only virtual components
                If TypeOf asmOcc.Definition Is VirtualComponentDefinition Then
                        'compare name selected from list to the
                                'existing virtual parts
                                If oOcc = sVirtPart Then
                        'delete existing virtual parts if name matches
                                asmOcc.delete
                                Else
                        End if
            Else
            End If
Next
  
Dim occs As ComponentOccurrences
occs = asmDoc.ComponentDefinition.Occurrences
  
Dim identity As Matrix
identity = ThisApplication.TransientGeometry.CreateMatrix
 
'create first instance of the virtual part
Dim virtOcc As ComponentOccurrence
if  iQTY >= 1 Then
virtOcc = occs.AddVirtual(sVirtPart, identity)
Else
Return
End if

'add next instance starting at instance2 (if applicable)
Dim index As Integer
index = 2
Do While index <= iQTY
occs.AddByComponentDefinition(virtOcc.Definition, identity)
index += 1
Loop


Inventor HSM Express – The Free CAM Solution for Inventor Users – Beta Invitation

$
0
0
Issue:
You're looking for an integrated CAM solution to use with Autodesk Inventor.


Potential Solution:
Check out the Inventor HSM Express Beta tools.


From the Autodesk CAM Team:
The Autodesk CAM Team has launched the official Public Beta of Inventor HSM Express, a free 2-1/2 Axis CAM solution for Inventor users.

Powered by HSMWorks CAM technology, Inventor HSM Express has all the capabilities of HSMXpress – the Free CAM Solution for SolidWorks and is seamlessly integrated inside the design environment of Autodesk Inventor. This integration allows Inventor users to take advantage of workflow and tools they are used to when programming CNC toolpaths for their 2.5D machining projects.

If you are an experienced Inventor user we could really use your help. Our goal is to have a CAM solution so tightly integrated with Inventor that you don’t perceive any difference when switching between the   modeling environment and the CAM environment. Your feedback is crucial in helping us achieve this goal. And, for those of you with CNC programming experience, we would love to hear your first impressions in working with our new CAM tools.

If you'd like  to participate in our Beta but don’t have Autodesk Inventor you can download a 30-day trial at this link: http://www.autodesk.com/products/autodesk-inventor-family/free-trial

To participate in the Inventor HSM Express Beta and watch a quick preview of Inventor HSM Express, you can visit this link: https://beta.autodesk.com/callout/?callid=22396638F5374AC28E2F1A24CC7EEFA8

Ilogic - Add Standard Virtual Parts From an Excel File

$
0
0
Issue:
You have a number of standard Virtual parts that you find yourself adding over and over. You'd like to have the ability to add them based on a predefined list.

You saw the post about adding these parts from a text file, but you'd like to be able to add standard iProperties for these virtual parts also. This way your Bill of Materials information for the virtual parts can be set when the virtual part is created. So you were wanting to read data from an XLS file that contains all of the information that you typically add for virtual parts.


Solution:
Here is an example iLogic rule that will read a *.xls file and present the contents to the user in an input box list. The user is then asked to enter a quantity for the virtual part, and then the virtual part occurrences are added to the assembly. If one or more occurrences of the virtual part exist in the assembly, the iLogic rule deletes them and just adds back the total number needed.

As the virtual parts are added, the iProperty information found in the *.xls file is added also. 
In this example the parts are placed by using the A column, which is the description. Then the other columns are read in and used to populate the virtual part's iProperties.

An example XLS file list with iProperty information.


Dim MyArrayList As New ArrayList
MyArrayList = GoExcel.CellValues("U:\iLogic examples\Virtual Part List.xls", "Sheet1", "A2", "A1000")
Dim sVirtPart As String
'get user input from list
sVirtPart = InputListBox("Select a virtual part to add.", _
MyArrayList, MyArrayList.Item(0), "iLogic", "Standard Virtual Parts")
'check for empty input in the case where the user cancels out of the input box
If sVirtPart = ""Then
Return 'end rule
Else
End if

'get iProperties from the XLS file
For MyRow = 2 To 1000 'index row 2 through 1000
                'find the cell in column A that matches the user selection
                 If sVirtPart = (GoExcel.CellValue("A"& MyRow)) Then
            'get the iProperty from the XLS file for each column
                oProp1 = GoExcel.CellValue("A"& MyRow )
            oProp2 = GoExcel.CellValue("B"& MyRow )
            oProp3 = GoExcel.CellValue("C"& MyRow)
            oProp4 = GoExcel.CellValue("D"& MyRow)
            oProp5 = GoExcel.CellValue("E"& MyRow)
            Exit For
            End If
Next

'get quantity from user
iQTY = InputBox("Enter the TOTAL number of:"_
& vblf & "        ''"& sVirtPart & "''"_
& vblf & "to place in the assembly."_
& vblf &  vblf & "Note: Enter 0 to delete all existing instances.", "iLogic", "1")
'check for empty input in the case where the user cancels out of the input box
If iQTY = ""Then
Return 'end rule
Else
End if

'define assembly
Dim asmDoc As AssemblyDocument
asmDoc = ThisApplication.ActiveDocument
'define assembly Component Definition
Dim oAsmCompDef As AssemblyComponentDefinition
oAsmCompDef = ThisApplication.ActiveDocument.ComponentDefinition

'Iterate through all of the occurrences in the assembly
Dim asmOcc As ComponentOccurrence
For Each asmOcc  In oAsmCompDef.Occurrences
                'get name of occurence only (sees only everything left of the colon)
                Dim oOcc As Object
            oOcc = asmOcc.name.Split(":")(0)
            'look at only virtual components
                If TypeOf asmOcc.Definition Is VirtualComponentDefinition Then
                        'compare name selected from list to the
                                'existing virtual parts
                                If oOcc = sVirtPart Then
                        'delete existing virtual parts if name matches
                                asmOcc.delete
                                Else
                        End if
            Else
            End If
Next
 
Dim occs As ComponentOccurrences
occs = asmDoc.ComponentDefinition.Occurrences
 
Dim identity As Matrix
identity = ThisApplication.TransientGeometry.CreateMatrix

'create first instance of the virtual part
Dim virtOcc As ComponentOccurrence
if  iQTY >= 1 Then
virtOcc = occs.AddVirtual(sVirtPart, identity)
            Try
            iProperties.Value(sVirtPart & ":1", "Project", "Description") = oProp1
                Catch 'catch error when oProp1 = nothing
                End Try
            Try
            iProperties.Value(sVirtPart & ":1", "Project", "Part Number") = oProp2
                Catch 'catch error when oProp2 = nothing
                End Try
            Try
            iProperties.Value(sVirtPart & ":1", "Project", "Revision Number") = oProp3
                Catch 'catch error when oProp3 = nothing
                End Try
            Try
            iProperties.Value(sVirtPart & ":1", "Project", "Vendor") = oProp4
                Catch 'catch error when oProp4 = nothing
                End Try
            Try
            iProperties.Value(sVirtPart & ":1", "Summary", "Comments") = oProp5
                Catch 'catch error when oProp5 = nothing
                End Try
Else
Return
End if

'add next instance starting at instance2 (if applicable)
Dim index As Integer
index = 2
Do While index <= iQTY
occs.AddByComponentDefinition(virtOcc.Definition, identity)
index += 1
Loop


Use 3D Solid Edges for Frame Generator Selection

$
0
0
Issue:
You use the Frame Generator tools in Autodesk Inventor all of the time, but you find that creating the base 3D sketch is tedious, time consuming, and doesn't always take edits well. Is there another way to do this?


Solution:
There are some times when a creating a 3D sketch is required, but often time it's helpful to know that you can use the edges of  a 3D base part to place Frame Generator members. When you select a part edge, Frame Generator automatically projects the geometry into the Frame Reference Model that it creates using the selected edges.

For instance you could create a basic 3D solid part model such as the one shown, and place it into an assembly file:

If you need more edges to use for the frame selection you can edit the base part model, and sketch on the faces of the solid:


 There are times where you might want to create a 3d Sketch based upon 2D sketch geometry. Here a 3D sketch is created and the 2D sketch is projected to the face pf the part to provide more edges to use in the frame. This is done using the 3D Project to Surface tool:
http://wikihelp.autodesk.com/Inventor/enu/2012/Help/3320-Show_Me_3320/3321-Show_Me_3321/3538-3D_Sket...


Often it's helpful to make the base part a clear color so you can see all of the edges to be used for selection:
 In order to prevent the base model from impacting the mass of your assembly, you can set it to Reference:


 Once you are finished selecting edges, you can just turn off the Visibility setting of the base part file, leaving only the frame showing:

iLogic: How to learn Inventor's Application Programming Interface (API)

$
0
0
Issue:
You've been somewhat successful using iLogic code examples that you find online, but you'd really like to learn how to create your own code from scratch. So how do these other people find the programming calls to create new code? It seems that there is some missing puzzle piece that you can't seem to locate, something that explains how to get started programming in Inventor. Does something like that exist?  


Solution:
Programming in iLogic involves two different methods, that are often mixed together. The first method is to use "native" iLogic functions, the second is to use "raw" API functions by employing Inventor's Application Programming Interface (API).

  • "Native" iLogic functions are a dictionary of automation functions that deliver the power of Inventor's Application Programming Interface (API) to users by using single-line automation functions. So you can think of iLogic as a collection of the more common programming and automation tasks that the developers have "cleaned" up so that users can create some Rule based automation in their design. This mean that the iLogic dictionary is just a simple subset of the larger API collection. 

  • "Raw"API language can be run using the iLogic tools as well, but will require more knowledge of VB.Net based syntax, and more need to declare and define within the code language. To get started with Inventor's Application Programming Interface (API) you can use the following links. 

**********    **********     **********    **********     **********    **********     **********    **********     **********
This paper provides a brief overview of Inventor’s programming interface and illustrates this with examples using iProperties:
VBA & Inventor API Introduction (zip file - 11.2 MB)

**********    **********     **********    **********     **********    **********     **********    **********     **********


**********    **********     **********    **********     **********    **********     **********    **********     **********
The following resource will help you get started with programming Inventor. It assumes familiarity with Autodesk Inventor and general programming concepts:

DevTV: Introduction to Inventor Programming, a self-paced video tutorial demonstrating how to get started developing with Autodesk Inventor.
View online | Download (zip file- 51.8 MB)
**********    **********     **********    **********     **********    **********     **********    **********     **********


**********    **********     **********    **********     **********    **********     **********    **********     **********
The links above as well as additional information concerning the Autodesk Developer Network resources, can be found at this link:

http://usa.autodesk.com/adsk/servlet/index?id=1079044&siteID=123112

**********    **********     **********    **********     **********    **********     **********    **********     **********

Infinite Skills – Autodesk Inventor 2014 Tutorial Series

$
0
0
Are you looking for a video tutorial series for Autodesk Inventor?
 
Infinite Skills has recently released its Learning Autodesk Inventor 2014 series featuring instructor Adam Cooper.  I was provided the DVD and asked to review this tutorial series, and was very pleased with the content found within.
When I popped in the DVD, the autoplay opened the viewing application and presented me with the Chapter menu as shown here:
Click to Enlarge
 
Once I clicked on Chapter 1, I was presented with a list of topics as shown here:


Click to Enlarge
 

A status legend on the right shows which videos I've watched with a shaded dot, as well as a partially shaded dot for those videos that I only watched part of. As you can image this can be a great help when jumping around within the chapters.

Once a topic is selected the video plays in the application. The author's pace is quite good, but since it is a video you can always use the buttons found in the video control tool bar to pause and rewind as needed.


Click to Enlarge
 Also included on the DVD are all of the working files needed for the exercises. The files can be accessed easily via the video interface.


Click to Enlarge

This DVD contains some outstanding material from a very knowledgeable instructor. You'll have the feeling you're in the classroom being led through the course material with Adam Cooper right there helping you along the way!

For more information, have a look at the Infinite Skills website:
 http://www.infiniteskills.com/training/learning-autodesk-inventor-2014.html

iLogic - Delete Custom iProperties

$
0
0
Issue:
You have some custom iProperties in your file that you want to remove. Because you have a lot of files that contain these custom iProperties, you find yourself doing this quite often. You'd like an iLogic rule that will help with this when you encounter these custom iProperties.


Solution:
Here are three rule variations to help with this.

Variation 1
Delete only the custom iProperties found in the list.


'------- start of ilogic ------

'define list of custom properties to delete
Dim MyArrayList As New ArrayList
MyArrayList.add("Hello World 001")
MyArrayList.add("Hello World 002")
MyArrayList.add("Hello World 003")

'define custom property collection
oCustomPropertySet = ThisDoc.Document.PropertySets.Item("Inventor User Defined Properties")
'look at each property in the collection
For Each oCustProp in oCustomPropertySet
'check property name against the list you want to delete
If MyArrayList.Contains(oCustProp.name)Then
'delete the custom iProperty
oCustProp.Delete
Else
'skip it
End If
Next

'------- end of ilogic ------


Variation 2
Delete only the custom iProperties NOT found in the list.


'------- start of ilogic ------

'define list of custom properties to keep
Dim MyArrayList As New ArrayList
MyArrayList.add("Hello World 001")
MyArrayList.add("Hello World 002")
MyArrayList.add("Hello World 003")

'define custom property collection
oCustomPropertySet = ThisDoc.Document.PropertySets.Item("Inventor User Defined Properties")
'look at each property in the collection
For Each oCustProp in oCustomPropertySet
'check property name against the list you don't want to delete
If MyArrayList.Contains(oCustProp.name)Then
'skip it
Else
'delete the custom iProperty
oCustProp.Delete
End If
Next

'------- end of ilogic ------


Variation 3
Delete All custom iProperties found in the part.


'------- start of ilogic ------

'define custom property collection
oCustomPropertySet = ThisDoc.Document.PropertySets.Item("Inventor User Defined Properties")
'look at each property in the collection
For Each oCustProp in oCustomPropertySet
'delete the custom iProperty
oCustProp.Delete
Next

'------- end of ilogic ------

iLogic - TitleBlock Project Data From Excel

$
0
0
Issue:
You have a title block that uses prompted entry, and you'd like to fill those fields in from data that is in a spread sheet. You know that the best way to set up a title block is to use the model file's iProperties, but unfortunately you can't make changes to the title block that you've been provided. But there must be a better way than just editing each sheet and re-typing the same information over and over, right?
 

Solution:
Here is an iLogic rule that asks the user to browse for an spreadsheet. Then it reads in the data and matches the field name to the title block field, and if a match is found it writes the field value to the title block's prompted entry field.


Here is an example spread sheet:


Here is an example Title Block:


 And here you can see the field text in the title block, with those that are prompted entries denoted by carats: < >


So the iLogic code gets the information from the spreadsheet and then writes it to the title block for every sheet in the drawing.


I've added some lines to activate each drawing sheet and a delay timer to step through each text field so that you can watch the changes, but all of that could be removed if you'd prefer to speed up the running of the rule.


'Browse for the Excel file
Dim oFileDlg As inventor.FileDialog = Nothing
InventorVb.Application.CreateFileDialog(oFileDlg)
oFileDlg.Filter = "Excel Files (*.xls;*.xlsx)|*.xls;*.xlsx"
oFileDlg.DialogTitle = "Select a Project Information Excel File"
oFileDlg.InitialDirectory = ThisDoc.Path
oFileDlg.CancelError = True
On Error Resume Next
oFileDlg.ShowOpen()
If Err.Number <> 0 Then
'exit if file not selected
Return
ElseIf oFileDlg.FileName <> ""Then
myXLS  = oFileDlg.FileName
End If

'look at sheet1 of the spreadsheet
GoExcel.Open(myXLS, "Sheet1")

'define the drawing
Dim oDoc As DrawingDocument
oDoc = ThisApplication.ActiveDocument
Dim oSheet As Sheet
Dim oPromptEntry

'gather the current sheet name
Dim oCurrentSheet
oCurrentSheet = oDoc.ActiveSheet.Name

'step through each sheet
i = 0
For Each oSheet In oDoc.Sheets
  i = i+1
  'activate the sheet
  ThisApplication.ActiveDocument.Sheets.Item(i).Activate
   oTitleBlock=oSheet.TitleBlock
    oTextBoxes=oTitleBlock.Definition.Sketch.TextBoxes
    For Each oTextBox In oTitleBlock.Definition.Sketch.TextBoxes
                'look at the first 100 rows of the Excel file
                'start at row 2, since row 1 contains headings
                For rowCheck = 2 To 100
            'read the value of the column A
                Dim myCell  As String
            myCell = "<"& GoExcel.CellValue("A"& rowCheck) & ">"
                'compare the titleblock field name to the value in column A
                If myCell = oTextBox.Text Then
                        'get the value from column B
                                oPromptEntry  = GoExcel.CellValue("B"& rowCheck)      
                        'set the prompted entry value
                                Call oTitleBlock.SetPromptResultText(oTextBox, oPromptEntry)
                        '______ add a small delay between text field updates
                                PauseTime = 0.3 'seconds
                                Start = Timer
                        Do While Timer < Start + PauseTime
                                ThisApplication.UserInterfaceManager.DoEvents
                                'present a status bar message
                                ThisApplication.StatusBarText = _
                                oDoc.ActiveSheet.Name & " is updating...."
                                Loop
                        '______ end of timer code
                End If
            Next
    Next
Next
'return to original sheet
ThisApplication.ActiveDocument.Sheets.Item(oCurrentSheet).Activate
'clear the status bar message
ThisApplication.StatusBarText = ""
 

Inventor 2015 User Interface Is Missing Buttons?

$
0
0
Issue:
You've upgraded to Autodesk Inventor 2015 from a previous version and find that some of the tool buttons have been hidden and stacked into grouped, fly-out menus. You've checked with a reputable attorney, and have found out that it's not legal to sneak into the Autodesk Inventor development team's office and release two dozen rabid ferrets, as payback for them once again dinking with Inventor's interface. So as "Plan B" you'd like to find some way to make the buttons more easily accessible. Can this be done?


Solution:
You can right click any tool group that has a dropdown arrow next to it and choose Ungroup. And you can also select a specific tool and choose Move to Main Panel if it's one you use often.

For further information on customizing the display of ribbon panels, visit this link:
http://help.autodesk.com/view/INVNTOR/2015/ENU/?guid=GUID-E5AB014C-D87B-4D7B-963C-00847E3DDE01


iLogic: Working with the Active Sketch

$
0
0

Issue:
You're working with sketches in some iLogic code and want to be able to find the active sketch name, or active sketch number. 


Solution:
Here are a couple of quick rules that will do this. And also as a bonus there is a quick rule to delete all sketches in the part.

Rule1: Find the active sketch name


Dim oSketch As PlanarSketch
If Typeof ThisApplication.ActiveEditObject Is Sketch Then
oSketch = ThisApplication.ActiveEditObject
MessageBox.Show(oSketch.Name & " is the active Sketch", "iLogic")
Else
MessageBox.Show("Active Edit Object is not a Sketch", "iLogic")
End If


Rule2: Find the active sketch number


Dim oSketches As PlanarSketches
oSketches = ThisApplication.ActiveDocument.ComponentDefinition.Sketches

i=1
For Each oSketch in oSketches
            oSketch = oSketches.Item(i)
                   If oSketch Is ThisApplication.ActiveEditObject Then
                   MessageBox.Show("The active sketch is number: "& i, "iLogic")
                   Else
                   End If
          i=i+1  
Next


Rule3: Delete all sketches.


Dim oSketches As PlanarSketches
oSketches = ThisApplication.ActiveDocument.ComponentDefinition.Sketches

If Typeof ThisApplication.ActiveEditObject Is Sketch Then
ThisApplication.ActiveEditObject.ExitEdit
Else
End If

For Each oSketch in oSketches
            oSketch = oSketches.Item(oSketch.Name)
          oSketch.Delete
Next
 

iLogic - Dimension Text Scale

$
0
0
Issue:
You have some iLogic code to help you setup your drawing sheets and title block size (see this link from Jonathan Landeros for a great example of using iLogic to configure title block and borders). But when you change sheet to a larger size the dimension text is hard to read. You'd like to be able to adjust the dimension style text size as well.


Solution:
Here is a quick iLogic rule that prompts the user to set the text size. You could remove the user input lines, and just have the value set depending on the sheet size as well.


'set active document as drawing document
Dim oDoc As DrawingDocument
oDoc = ThisApplication.ActiveDocument

'get the active dim style
Dim oDStyle As DimensionStyle
oDStyle = oDoc.StylesManager.ActiveStandardStyle. _
ActiveObjectDefaults.LinearDimensionStyle

'get current font size
Dim sFontSize as String
sFontSize = oDStyle.TextStyle.FontSize

'get user input
oInput = InputBox("Active Dimesnion Style = "&  oDStyle.Name _
& vblf & vblf &  "Enter a new font size in inches.", "iLogic", _
Round(sFontSize / 2.54,3))

'set font size for dim style
oDStyle.TextStyle.FontSize = oInput * 2.54


Here is a related topic also:
http://inventortrenches.blogspot.com/2011/05/use-ilogic-to-change-sheet-orientation.html

iLogic - Suppress Components in all but the Active Level of Detail

$
0
0
Issue:
Your assembly has several Level of Detail Representations set up, which works well. The problem is that when you add a new component to the assembly, you have to go to each Level of Detail and suppress the component in order to prevent it from showing up in those existing Level of Detail Representations.


Solution:
Here is an iLogic rule that will suppress any selected components in all of the other LOD's, with the exception of the active LOD.

This allows you to place the component in the assembly with the LOD you want to add the component to set active, then select the component (or components) and run this iLogic rule to remove the component(s) from the other LODs.

This iLogic rule also doesn't suppress the selected components in the standard LODs, such as the "Master" LOD, the "All Content Center Suppressed" LOD, etc.

Note too that it saves the file each time one of the other LODs is modified in order to make the changes "stick", so if you have a large assembly with many LODs it might take a bit for this rule to run.


Dim oDoc As AssemblyDocument
oDoc = ThisApplication.ActiveDocument

' Find all selected components and add them to an ObjectCollection.
Dim oSelected As ObjectCollection
oSelected = ThisApplication.TransientObjects. _
CreateObjectCollection (oDoc.SelectSet)

'define LOD rep
Dim oLODRep As LevelOfDetailRepresentation

'define rep manager
Rep_Manager =ThisApplication.ActiveDocument. _
ComponentDefinition.RepresentationsManager

'define an arraylist to hold the list of  LOD rep names
Dim NameList As New ArrayList()

'look at the LOD reps in the assembly
For Each oLODRep in Rep_Manager.LevelOfDetailRepresentations
'add the LOD names to the array list
NameList.add(oLODRep.Name)
Next

Dim myLOD as LevelOfDetailRepresentation
'get the name of the active LOD
myLOD = Rep_Manager.ActiveLevelOfDetailRepresentation

'remove active LOD from list
NameList.remove(myLOD.name)

'remove standard LODs from list
NameList.remove("Master")
NameList.remove("All Components Suppressed")
NameList.remove("All Parts Suppressed")
NameList.remove("All Content Center Suppressed")

'step through the LOD list
'and suppress the selected components
Dim sName as String
For Each sName in NameList
                'Activate the LOD
                Rep_Manager.LevelOfDetailRepresentations(sName).Activate
                For Each oObject in oSelected
                                Try
                        'suppress component
                                Component.IsActive(oObject.Name) = False
                                Catch ' catch any errors
                                End Try
                        Next
            ThisDoc.Save
Next    

'set the original active LOD back to active
Rep_Manager.LevelOfDetailRepresentations(Trim(myLOD.Name)).Activate

iLogic and the Inventor Project File

$
0
0


Issue:
You want to reference the current Inventor Project file within an iLogic rule.

Solution:
Here is a quick iLogic snippet that will demonstrate how to work with the Project file and path. In this example the project name, project file name, project path, and the full project path and file name are written to a message box.


'------ start of iLogic ----------------------------------------------------------

Dim IPJ as String
Dim IPJ_Name as String
Dim IPJ_Path as String
Dim FNamePos As Long
'set a reference to the FileLocations object.
IPJ = ThisApplication.FileLocations.FileLocationsFile
'get the location of the last backslash seperator
FNamePos = InStrRev(IPJ, "\", -1)    
'get the project file name with the file extension
IPJ_Name = Right(IPJ, Len(IPJ) - FNamePos)
'get the project name (without extension)
IPJ_ShortName = Left(IPJ_Name, Len(IPJ_Name) - 4)
'get the path of the folder containing the project file
IPJ_Folder_Location = Left(IPJ, Len(IPJ) - Len(IPJ_Name))

MessageBox.Show("Project Name: "& IPJ_ShortName _
& vblf & "Project File Name: "& IPJ_Name _
& vblf & "Project Path: "& IPJ_Folder_Location _
& vblf & "Project Path and File Name: "& IPJ, "iLogic")

'------ end of iLogic ----------------------------------------------------------


******** Update (01/09/2013) ********
Here's some code to work with the project WorkSpace:

myWorkSpace = ThisApplication.FileLocations.Workspace
MessageBox.Show("WorkSpace Path:  "& myWorkSpace, "iLogic")


 And here's another snippet to work with project Workgroups:


Dim asNames() As String = {}
Dim asPaths() As String = {}
Dim iNumWorkgroups As Long
ThisApplication.FileLocations.Workgroups(iNumWorkgroups, asNames, asPaths)

If iNumWorkgroups = 0 Then
MessageBox.Show("No Workgroups are defined in the current project.", "iLogic")
Else
          i = 0
          Do until i = iNumWorkgroups
            wGName = asNames(i)
          wGPath = asPaths(i)
          MessageBox.Show("WorkGroup Name: "& wGName _
            & vblf & "WorkGroup Path: "& wGPath , "iLogic")
          i = i + 1
          Loop
End If


iLogic: Get File Information for the Selected Component

$
0
0


Issue:
You want to find the file name or path of a selected component in your iLogic rule.

Solution:
Here is a quick iLogic snippet that will demonstrate how to work with the selected component file and path. In this example the file name, file name without extension, file path, and the full path and file name are written to a message box.


'------------ start of ilogic--------------------
'get currently selected component
Dim oOccurrence as ComponentOccurrence
Try
  oOccurrence = ThisDoc.Document.SelectSet.Item(1)
Catch
  MessageBox.Show("Please select a component before running this rule.", "iLogic")
  Return
End Try

Dim doc As Document
Dim CurFileName As String

'set the selected item
oOccurrence = ThisApplication.ActiveDocument.SelectSet.Item(1)

'get the selected item document occurrence name
doc = oOccurrence.Definition.Document

'get the path and file name of the selected item
CurFileName = doc.FullFileName

'defines backslash as the subdirectory separator
Dim strCharSep As String = System.IO.Path.DirectorySeparatorChar

'find the postion of the last backslash in the path
FNamePos = InStrRev(CurFileName, "\", -1)   
'get the file name with the file extension
Name = Right(CurFileName, Len(CurFileName) - FNamePos)
'get the file name (without extension)
ShortName = Left(Name, Len(Name) - 4)
'get the path of the folder containing the file
Folder_Location = Left(CurFileName, Len(CurFileName) - Len(Name))

MessageBox.Show("File Name: "& Name _
& vblf & "File Name without extension: "& ShortName _
& vblf & "File Path: "& Folder_Location _
& vblf & "Path and File Name: "& CurFileName, "iLogic")
'------------ end of ilogic--------------------

Disable Automatic PDF Display

$
0
0


Issue:
When you use Save As> Save Copy As> PDF, or Export> PDF,  Inventor always opens the PDF viewer to show the PDF file after it is published. This can be a bother, due to the delay caused by waiting for the PDF viewer to open each time. Is there a way to change this so that the PDF does not automatically open after it is published?

Solution:
As odd as it sounds, this is controlled in the publish options of the DWF file. 

Go to Export> Export to DWF and un-check the Display Published File in Vieweroption found at the bottom of the Generaltab. This option controls the PDF viewer as well as the DWF. With this option unchecked the PDF will not open automatically after it is published.

iLogic: Virtual Components

$
0
0


Issue:
You have some iLogic code that iterates through all of the components in an assembly and does some something with the file for each. However, if the assembly contains a virtual component then the iLogic code fails. Is there a way to skip over virtual components when encountered?

Solution:
Here is an iLogic snippet that demonstrates this using If Not TypeOf. In this simple example the iLogic rule simply displays the occurrence name if the occurrence is not a virtual component.


'------------ start of ilogic--------------------
' set a reference to the assembly component definintion.
' This assumes an assembly document is open.
Dim oAsmCompDef As AssemblyComponentDefinition
oAsmCompDef = ThisApplication.ActiveDocument.ComponentDefinition

'Iterate through all of the occurrences
Dim oOccurrence As ComponentOccurrence
For Each oOccurrence In oAsmCompDef.Occurrences
'check for and skip virtual components
'(in case a virtual component trips things up)
If Not TypeOf oOccurrence.Definition Is VirtualComponentDefinition Then
'Show occurrence name In the message box body
MessageBox.Show(oOccurrence.Name, "iLogic")
Else
End If
Next
'------------ end of ilogic--------------------

Inventor Background Color as White: Improved

$
0
0

Issue:
You'd like to use a solid white back ground in Inventor because it allows you to take quick screen captures for use in illustrations for a variety of publications (examples:  how to videos, company  standards documentation, build procedures, catalogs, and so on).

A screen capture taken while using a solid white background.

The problem however, is that when you use the Presentation color scheme, all of the projected geometry is yellow. Working with yellow lines on a white background makes these projected sketch lines difficult to see.

 
Additionally, if you use Inventor during a presentation or training, the white background used in the Presentation color scheme often shows up best, but again the yellow projected lines makes it difficult to work with, particularly with some projectors.

Is there a way to change the projected line color?

Solution:
Rather than changing the projected line color used in the Presentation color scheme, you can use one of the other color schemes, and use a solid white background image. To do so, go to the Tools tab > Application Options button > Colors tab,  and then change the Background setting to Background Image. Then use the browse button for the File Name setting to browse out and select a previously saved image file. 


I prefer to use the Sky color scheme (it uses green lines for the projected geometry color), with a file called Blank White.jpg. I created the file called Blank White.jpg using Microsoft Paint and saved it to the Inventor Backgrounds directory.
 
 Give this a try and I think you'll find that it works much better than the yellow on white of the Presentation color scheme.

iLogic: Adding a Save As Dialog Box

$
0
0


Issue:
You'd like to present the user with a Save As dialog box that will allow them to browse for a folder during the execution of your iLogic rule. However, the examples in the iLogic snippets all use a predefined or hard coded folder path. Is there a way to present a Save As dialog box, so the iLogic rule can be more dynamic?

Solution:
Here's a quick snippet that presents a Save dialog box, allowing a destination folder to be selected:


'define the active document
oDoc = ThisDoc.Document
'create a file dialog box
Dim oFileDlg As inventor.FileDialog = Nothing
InventorVb.Application.CreateFileDialog(oFileDlg)

'check file type and set dialog filter
If oDoc.DocumentType = kPartDocumentObject Then
oFileDlg.Filter = "Autodesk Inventor Part Files (*.ipt)|*.ipt"
Else if oDoc.DocumentType = kAssemblyDocumentObject Then
oFileDlg.Filter = "Autodesk Inventor Assembly Files (*.iam)|*.iam"
Else if oDoc.DocumentType = kDrawingDocumentObject Then
oFileDlg.Filter = "Autodesk Inventor Drawing Files (*.idw)|*.idw"
End If

'set the directory to open the dialog at
oFileDlg.InitialDirectory = ThisDoc.WorkspacePath()
'set the file name string to use in the input box
oFileDlg.FileName = iProperties.Value("Project", "Part Number")

'work with an error created by the user backing out of the save
oFileDlg.CancelError = True
On Error Resume Next
'specify the file dialog as a save dialog (rather than a open dialog)
oFileDlg.ShowSave()

'catch an empty string in the imput
If Err.Number <> 0 Then
MessageBox.Show("No File Saved.", "iLogic: Dialog Canceled")
ElseIf oFileDlg.FileName <> ""Then
MyFile = oFileDlg.FileName
'save the file
oDoc.SaveAs(MyFile, False) 'True = Save As Copy & False = Save As
End If

iLogic: Batch Output PDFs from an Assembly File

$
0
0
Issue:
You'd like to output a PDF file from the drawings of all the components found in an assembly file (if those components have a drawing file created), and you like also create a PDF of the top level assembly drawing as well. All of these PDFs should be written out to a single folder. Can this be done?

Solution:
Here's  an ilogic rule to batch output PDF files for each component in an assembly. This rule assumes that the component drawings share the same name and location of the component.

For example: C:\Temp\widget-450.ipt has a drawing: C:\Temp\widget-450.idw
If the drawing file is not found, then it simply moves on and looks at the next component.


This rule may not work for everyone, but it should provide a starting point from which it can be modified as needed. If you work with *.dwg files rather than *.idw files you can search and replace this code for idw and replace with dwg.

Here is the code in a *.txt file that can be downloaded as well:
http://forums.autodesk.com/autodesk/attachments/autodesk/78/455124/2/Batch%20PDFs.txt 


'define the active document as an assembly file
Dim oAsmDoc As AssemblyDocument
oAsmDoc = ThisApplication.ActiveDocument
oAsmName = Left(oAsmDoc.DisplayName, Len(oAsmDoc.DisplayName) -4)

'check that the active document is an assembly file
If ThisApplication.ActiveDocument.DocumentType <> kAssemblyDocumentObject Then
MessageBox.Show("Please run this rule from the assembly file.", "iLogic")
Exit Sub
End If

'get user input
RUsure = MessageBox.Show ( _
"This will create a PDF file for all of the asembly components that have drawings files."_
& vblf & "This rule expects that the drawing file shares the same name and location as the component."_
& vblf & ""_
& vblf & "Are you sure you want to create PDF Drawings for all of the assembly components?"_
& vblf & "This could take a while.", "iLogic  - Batch Output PDFs ",MessageBoxButtons.YesNo)

If RUsure = vbNo Then
Return
Else
End If

'- - - - - - - - - - - - -PDF setup - - - - - - - - - - - -
oPath = ThisDoc.Path
PDFAddIn = ThisApplication.ApplicationAddIns.ItemById("{0AC6FD96-2F4D-42CE-8BE0-8AEA580399E4}")
oContext = ThisApplication.TransientObjects.CreateTranslationContext
oContext.Type = IOMechanismEnum.kFileBrowseIOMechanism
oOptions = ThisApplication.TransientObjects.CreateNameValueMap
oDataMedium = ThisApplication.TransientObjects.CreateDataMedium

If PDFAddIn.HasSaveCopyAsOptions(oDataMedium, oContext, oOptions) Then
'oOptions.Value("All_Color_AS_Black") = 0
oOptions.Value("Remove_Line_Weights") = 1
oOptions.Value("Vector_Resolution") = 400
oOptions.Value("Sheet_Range") = Inventor.PrintRangeEnum.kPrintAllSheets
'oOptions.Value("Custom_Begin_Sheet") = 2
'oOptions.Value("Custom_End_Sheet") = 4
End If

'get PDF target folder path
oFolder = oPath & "\"& oAsmName & " PDF Files"

'Check for the PDF folder and create it if it does not exist
If Not System.IO.Directory.Exists(oFolder) Then
    System.IO.Directory.CreateDirectory(oFolder)
End If
'- - - - - - - - - - - - -

'- - - - - - - - - - - - -Component Drawings - - - - - - - - - - - -
'look at the files referenced by the assembly
Dim oRefDocs As DocumentsEnumerator
oRefDocs = oAsmDoc.AllReferencedDocuments
Dim oRefDoc As Document

'work the the drawing files for the referenced models
'this expects that the model has a drawing of the same path and name
For Each oRefDoc In oRefDocs
idwPathName = Left(oRefDoc.FullDocumentName, Len(oRefDoc.FullDocumentName) - 3) & "idw"
'check to see that the model has a drawing of the same path and name
If(System.IO.File.Exists(idwPathName)) Then
                        Dim oDrawDoc As DrawingDocument
                oDrawDoc = ThisApplication.Documents.Open(idwPathName, True)
            oFileName = Left(oRefDoc.DisplayName, Len(oRefDoc.DisplayName) -3)

            On error Resume Next ' if PDF exists and is open or read only, resume next
                 'Set the PDF target file name
                oDataMedium.FileName = oFolder & "\"& oFileName & "pdf"
                'Write out the PDF
                Call PDFAddIn.SaveCopyAs(oDrawDoc, oContext, oOptions, oDataMedium)
            'close the file
                oDrawDoc.Close
Else
'If the model has no drawing of the same path and name - do nothing
End If
Next
'- - - - - - - - - - - - -

'- - - - - - - - - - - - -Top Level Drawing - - - - - - - - - - - -
oAsmDrawing = ThisDoc.ChangeExtension(".idw")
oAsmDrawingDoc = ThisApplication.Documents.Open(oAsmDrawing, True)
oAsmDrawingName = Left(oAsmDrawingDoc.DisplayName, Len(oAsmDrawingDoc.DisplayName) -3)
'write out the PDF for the Top Level Assembly Drawing file
On error Resume Next ' if PDF exists and is open or read only, resume next
 'Set the PDF target file name
oDataMedium.FileName = oFolder & "\"& oAsmDrawingName & "pdf"
'Write out the PDF
Call PDFAddIn.SaveCopyAs(oAsmDrawingDoc, oContext, oOptions, oDataMedium)
'Close the top level drawing
oAsmDrawingDoc.Close
'- - - - - - - - - - - - -

MessageBox.Show("New Files Created in: "& vblf & oFolder, "iLogic")
'open the folder where the new ffiles are saved
Shell("explorer.exe "& oFolder,vbNormalFocus)

iLogic Replace Derived Reference

$
0
0
Issue:
You wish there was an option in parts created from derived components to replace the derived component.


Solution:
Here is a quick iLogic rule that will allow you to browse for a new file with which you can replace the derived reference of an existing derived component.

UPDATE:
A reader recently pointed out a limitation of this iLogic snippet stemming from its use of the API's FileDescriptor.ReplaceReference method. This method requires that the file being replaced and
the replacement file must share ancestry, that is to say that one file was saved from the other file, or both files were saved from the same "parent" file. Simply being aware of this will result in predictable results, but if you were attempting to use this snippet to replace two completely different files you might not have been able to get this to work.

Thanks to Peter for taking the time to bring my attention to this!


Dim oDoc as Document
oDoc = ThisDoc.Document
Dim oRefFile As FileDescriptor
Dim oOrigRefName As Object     

For Each oRefFile In oDoc.file.ReferencedFileDescriptors
'get the full file path to the original internal references
oOrigRefName = oRefFile.FullFileName

'present a File Selection dialog
Dim oFileDlg As inventor.FileDialog = Nothing
InventorVb.Application.CreateFileDialog(oFileDlg)
oFileDlg.InitialDirectory = oOrigRefName
oFileDlg.CancelError = True
On Error Resume Next
oFileDlg.ShowOpen()
If Err.Number <> 0 Then
Return
ElseIf oFileDlg.FileName <> ""Then
selectedfile = oFileDlg.FileName
End if

‘replace the reference
oRefFile.ReplaceReference (selectedfile)     
InventorVb.DocumentUpdate()
oOrigRefName = “”                                        
Next

iLogicVb.UpdateWhenDone = True
Viewing all 61 articles
Browse latest View live


<script src="https://jsc.adskeeper.com/r/s/rssing.com.1596347.js" async> </script>