Quantcast
Channel: From the Trenches with Autodesk Inventor

Infinite Skills – Autodesk Inventor 2014 Tutorial Series

$
0
0
Are you looking for a video tutorial series for Autodesk Inventor?
 
Infinite Skills has recently released its Learning Autodesk Inventor 2014 series featuring instructor Adam Cooper.  I was provided the DVD and asked to review this tutorial series, and was very pleased with the content found within.
When I popped in the DVD, the autoplay opened the viewing application and presented me with the Chapter menu as shown here:
Click to Enlarge
 
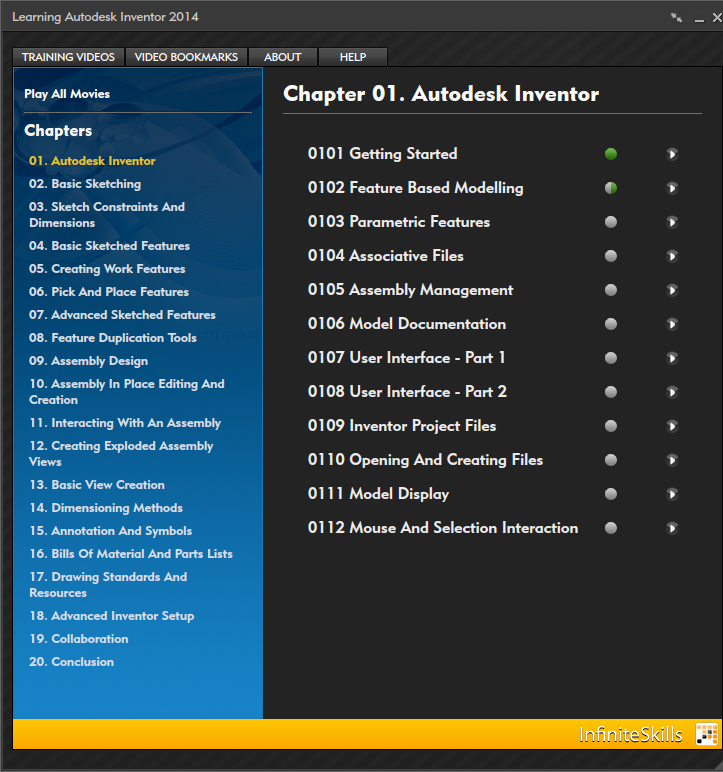
Once I clicked on Chapter 1, I was presented with a list of topics as shown here:


Click to Enlarge
 

A status legend on the right shows which videos I've watched with a shaded dot, as well as a partially shaded dot for those videos that I only watched part of. As you can image this can be a great help when jumping around within the chapters.

Once a topic is selected the video plays in the application. The author's pace is quite good, but since it is a video you can always use the buttons found in the video control tool bar to pause and rewind as needed.


Click to Enlarge
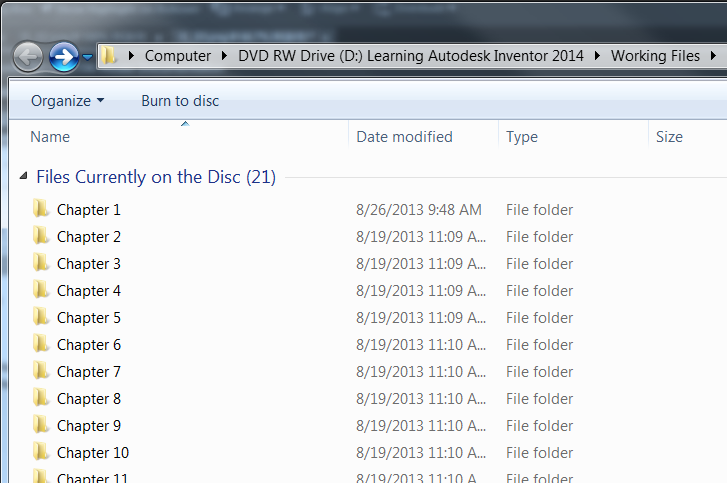
 Also included on the DVD are all of the working files needed for the exercises. The files can be accessed easily via the video interface.


Click to Enlarge

This DVD contains some outstanding material from a very knowledgeable instructor. You'll have the feeling you're in the classroom being led through the course material with Adam Cooper right there helping you along the way!

For more information, have a look at the Infinite Skills website:
 http://www.infiniteskills.com/training/learning-autodesk-inventor-2014.html


iLogic - Delete Custom iProperties

$
0
0
Issue:
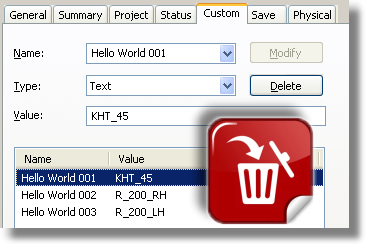
You have some custom iProperties in your file that you want to remove. Because you have a lot of files that contain these custom iProperties, you find yourself doing this quite often. You'd like an iLogic rule that will help with this when you encounter these custom iProperties.


Solution:
Here are three rule variations to help with this.

Variation 1
Delete only the custom iProperties found in the list.


'------- start of ilogic ------

'define list of custom properties to delete
Dim MyArrayList As New ArrayList
MyArrayList.add("Hello World 001")
MyArrayList.add("Hello World 002")
MyArrayList.add("Hello World 003")

'define custom property collection
oCustomPropertySet = ThisDoc.Document.PropertySets.Item("Inventor User Defined Properties")
'look at each property in the collection
For Each oCustProp in oCustomPropertySet
'check property name against the list you want to delete
If MyArrayList.Contains(oCustProp.name)Then
'delete the custom iProperty
oCustProp.Delete
Else
'skip it
End If
Next

'------- end of ilogic ------


Variation 2
Delete only the custom iProperties NOT found in the list.


'------- start of ilogic ------

'define list of custom properties to keep
Dim MyArrayList As New ArrayList
MyArrayList.add("Hello World 001")
MyArrayList.add("Hello World 002")
MyArrayList.add("Hello World 003")

'define custom property collection
oCustomPropertySet = ThisDoc.Document.PropertySets.Item("Inventor User Defined Properties")
'look at each property in the collection
For Each oCustProp in oCustomPropertySet
'check property name against the list you don't want to delete
If MyArrayList.Contains(oCustProp.name)Then
'skip it
Else
'delete the custom iProperty
oCustProp.Delete
End If
Next

'------- end of ilogic ------


Variation 3
Delete All custom iProperties found in the part.


'------- start of ilogic ------

'define custom property collection
oCustomPropertySet = ThisDoc.Document.PropertySets.Item("Inventor User Defined Properties")
'look at each property in the collection
For Each oCustProp in oCustomPropertySet
'delete the custom iProperty
oCustProp.Delete
Next

'------- end of ilogic ------

iLogic - TitleBlock Project Data From Excel

$
0
0
Issue:
You have a title block that uses prompted entry, and you'd like to fill those fields in from data that is in a spread sheet. You know that the best way to set up a title block is to use the model file's iProperties, but unfortunately you can't make changes to the title block that you've been provided. But there must be a better way than just editing each sheet and re-typing the same information over and over, right?
 

Solution:
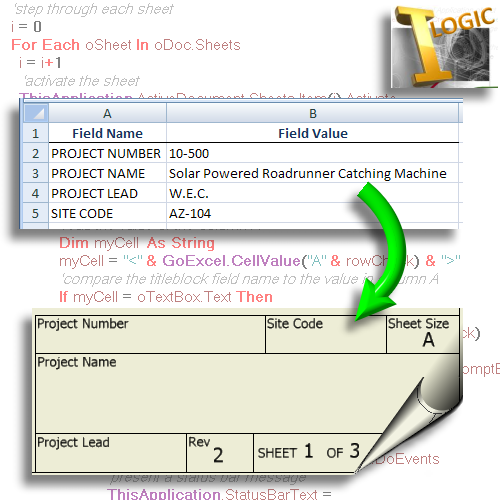
Here is an iLogic rule that asks the user to browse for an spreadsheet. Then it reads in the data and matches the field name to the title block field, and if a match is found it writes the field value to the title block's prompted entry field.


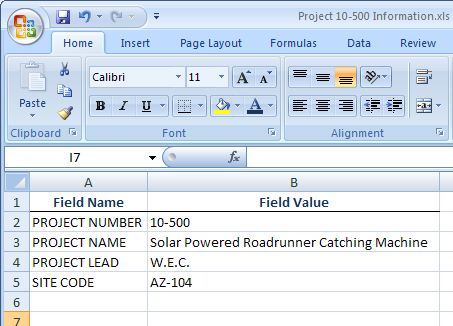
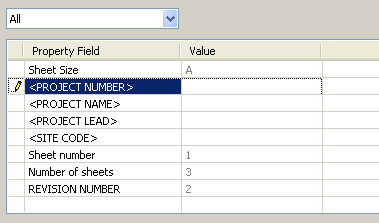
Here is an example spread sheet:


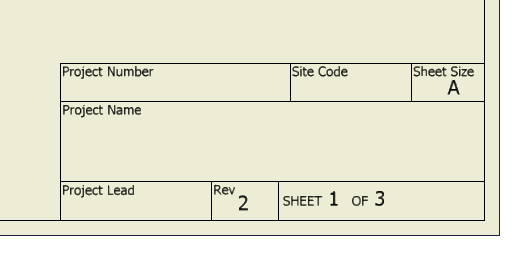
Here is an example Title Block:


 And here you can see the field text in the title block, with those that are prompted entries denoted by carats: < >


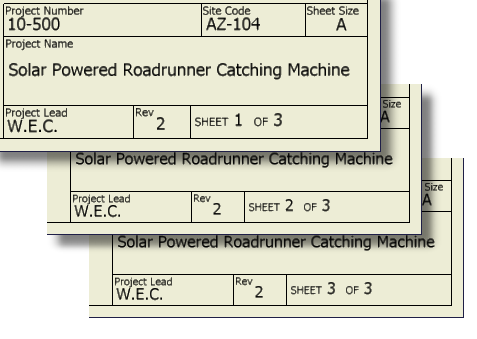
So the iLogic code gets the information from the spreadsheet and then writes it to the title block for every sheet in the drawing.


I've added some lines to activate each drawing sheet and a delay timer to step through each text field so that you can watch the changes, but all of that could be removed if you'd prefer to speed up the running of the rule.


'Browse for the Excel file
Dim oFileDlg As inventor.FileDialog = Nothing
InventorVb.Application.CreateFileDialog(oFileDlg)
oFileDlg.Filter = "Excel Files (*.xls;*.xlsx)|*.xls;*.xlsx"
oFileDlg.DialogTitle = "Select a Project Information Excel File"
oFileDlg.InitialDirectory = ThisDoc.Path
oFileDlg.CancelError = True
On Error Resume Next
oFileDlg.ShowOpen()
If Err.Number <> 0 Then
'exit if file not selected
Return
ElseIf oFileDlg.FileName <> ""Then
myXLS  = oFileDlg.FileName
End If

'look at sheet1 of the spreadsheet
GoExcel.Open(myXLS, "Sheet1")

'define the drawing
Dim oDoc As DrawingDocument
oDoc = ThisApplication.ActiveDocument
Dim oSheet As Sheet
Dim oPromptEntry

'gather the current sheet name
Dim oCurrentSheet
oCurrentSheet = oDoc.ActiveSheet.Name

'step through each sheet
i = 0
For Each oSheet In oDoc.Sheets
  i = i+1
  'activate the sheet
  ThisApplication.ActiveDocument.Sheets.Item(i).Activate
   oTitleBlock=oSheet.TitleBlock
    oTextBoxes=oTitleBlock.Definition.Sketch.TextBoxes
    For Each oTextBox In oTitleBlock.Definition.Sketch.TextBoxes
                'look at the first 100 rows of the Excel file
                'start at row 2, since row 1 contains headings
                For rowCheck = 2 To 100
            'read the value of the column A
                Dim myCell  As String
            myCell = "<"& GoExcel.CellValue("A"& rowCheck) & ">"
                'compare the titleblock field name to the value in column A
                If myCell = oTextBox.Text Then
                        'get the value from column B
                                oPromptEntry  = GoExcel.CellValue("B"& rowCheck)      
                        'set the prompted entry value
                                Call oTitleBlock.SetPromptResultText(oTextBox, oPromptEntry)
                        '______ add a small delay between text field updates
                                PauseTime = 0.3 'seconds
                                Start = Timer
                        Do While Timer < Start + PauseTime
                                ThisApplication.UserInterfaceManager.DoEvents
                                'present a status bar message
                                ThisApplication.StatusBarText = _
                                oDoc.ActiveSheet.Name & " is updating...."
                                Loop
                        '______ end of timer code
                End If
            Next
    Next
Next
'return to original sheet
ThisApplication.ActiveDocument.Sheets.Item(oCurrentSheet).Activate
'clear the status bar message
ThisApplication.StatusBarText = ""
 

Inventor 2015 User Interface Is Missing Buttons?

$
0
0
Issue:
You've upgraded to Autodesk Inventor 2015 from a previous version and find that some of the tool buttons have been hidden and stacked into grouped, fly-out menus. You've checked with a reputable attorney, and have found out that it's not legal to sneak into the Autodesk Inventor development team's office and release two dozen rabid ferrets, as payback for them once again dinking with Inventor's interface. So as "Plan B" you'd like to find some way to make the buttons more easily accessible. Can this be done?


Solution:
You can right click any tool group that has a dropdown arrow next to it and choose Ungroup. And you can also select a specific tool and choose Move to Main Panel if it's one you use often.

For further information on customizing the display of ribbon panels, visit this link:
http://help.autodesk.com/view/INVNTOR/2015/ENU/?guid=GUID-E5AB014C-D87B-4D7B-963C-00847E3DDE01


iLogic: Working with the Active Sketch

$
0
0

Issue:
You're working with sketches in some iLogic code and want to be able to find the active sketch name, or active sketch number. 


Solution:
Here are a couple of quick rules that will do this. And also as a bonus there is a quick rule to delete all sketches in the part.

Rule1: Find the active sketch name


Dim oSketch As PlanarSketch
If Typeof ThisApplication.ActiveEditObject Is Sketch Then
oSketch = ThisApplication.ActiveEditObject
MessageBox.Show(oSketch.Name & " is the active Sketch", "iLogic")
Else
MessageBox.Show("Active Edit Object is not a Sketch", "iLogic")
End If


Rule2: Find the active sketch number


Dim oSketches As PlanarSketches
oSketches = ThisApplication.ActiveDocument.ComponentDefinition.Sketches

i=1
For Each oSketch in oSketches
            oSketch = oSketches.Item(i)
                   If oSketch Is ThisApplication.ActiveEditObject Then
                   MessageBox.Show("The active sketch is number: "& i, "iLogic")
                   Else
                   End If
          i=i+1  
Next


Rule3: Delete all sketches.


Dim oSketches As PlanarSketches
oSketches = ThisApplication.ActiveDocument.ComponentDefinition.Sketches

If Typeof ThisApplication.ActiveEditObject Is Sketch Then
ThisApplication.ActiveEditObject.ExitEdit
Else
End If

For Each oSketch in oSketches
            oSketch = oSketches.Item(oSketch.Name)
          oSketch.Delete
Next
 

iLogic - Dimension Text Scale

$
0
0
Issue:
You have some iLogic code to help you setup your drawing sheets and title block size (see this link from Jonathan Landeros for a great example of using iLogic to configure title block and borders). But when you change sheet to a larger size the dimension text is hard to read. You'd like to be able to adjust the dimension style text size as well.


Solution:
Here is a quick iLogic rule that prompts the user to set the text size. You could remove the user input lines, and just have the value set depending on the sheet size as well.


'set active document as drawing document
Dim oDoc As DrawingDocument
oDoc = ThisApplication.ActiveDocument

'get the active dim style
Dim oDStyle As DimensionStyle
oDStyle = oDoc.StylesManager.ActiveStandardStyle. _
ActiveObjectDefaults.LinearDimensionStyle

'get current font size
Dim sFontSize as String
sFontSize = oDStyle.TextStyle.FontSize

'get user input
oInput = InputBox("Active Dimesnion Style = "&  oDStyle.Name _
& vblf & vblf &  "Enter a new font size in inches.", "iLogic", _
Round(sFontSize / 2.54,3))

'set font size for dim style
oDStyle.TextStyle.FontSize = oInput * 2.54


Here is a related topic also:
http://inventortrenches.blogspot.com/2011/05/use-ilogic-to-change-sheet-orientation.html

iLogic - Suppress Components in all but the Active Level of Detail

$
0
0
Issue:
Your assembly has several Level of Detail Representations set up, which works well. The problem is that when you add a new component to the assembly, you have to go to each Level of Detail and suppress the component in order to prevent it from showing up in those existing Level of Detail Representations.


Solution:
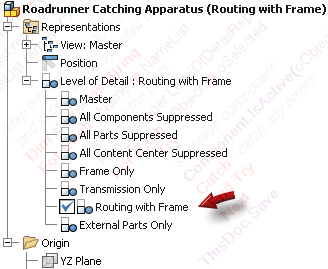
Here is an iLogic rule that will suppress any selected components in all of the other LOD's, with the exception of the active LOD.

This allows you to place the component in the assembly with the LOD you want to add the component to set active, then select the component (or components) and run this iLogic rule to remove the component(s) from the other LODs.

This iLogic rule also doesn't suppress the selected components in the standard LODs, such as the "Master" LOD, the "All Content Center Suppressed" LOD, etc.

Note too that it saves the file each time one of the other LODs is modified in order to make the changes "stick", so if you have a large assembly with many LODs it might take a bit for this rule to run.


Dim oDoc As AssemblyDocument
oDoc = ThisApplication.ActiveDocument

' Find all selected components and add them to an ObjectCollection.
Dim oSelected As ObjectCollection
oSelected = ThisApplication.TransientObjects. _
CreateObjectCollection (oDoc.SelectSet)

'define LOD rep
Dim oLODRep As LevelOfDetailRepresentation

'define rep manager
Rep_Manager =ThisApplication.ActiveDocument. _
ComponentDefinition.RepresentationsManager

'define an arraylist to hold the list of  LOD rep names
Dim NameList As New ArrayList()

'look at the LOD reps in the assembly
For Each oLODRep in Rep_Manager.LevelOfDetailRepresentations
'add the LOD names to the array list
NameList.add(oLODRep.Name)
Next

Dim myLOD as LevelOfDetailRepresentation
'get the name of the active LOD
myLOD = Rep_Manager.ActiveLevelOfDetailRepresentation

'remove active LOD from list
NameList.remove(myLOD.name)

'remove standard LODs from list
NameList.remove("Master")
NameList.remove("All Components Suppressed")
NameList.remove("All Parts Suppressed")
NameList.remove("All Content Center Suppressed")

'step through the LOD list
'and suppress the selected components
Dim sName as String
For Each sName in NameList
                'Activate the LOD
                Rep_Manager.LevelOfDetailRepresentations(sName).Activate
                For Each oObject in oSelected
                                Try
                        'suppress component
                                Component.IsActive(oObject.Name) = False
                                Catch ' catch any errors
                                End Try
                        Next
            ThisDoc.Save
Next    

'set the original active LOD back to active
Rep_Manager.LevelOfDetailRepresentations(Trim(myLOD.Name)).Activate

Determine File Type for iLogic Rule

$
0
0
Issue:
You need your iLogic code to check to see if the file type is a part file first, before running. Otherwise it generates an error. Is there a way to do this?


Solution: 
Here are a couple of quick code snippets that demonstrate how to do this using the DocumentType enumerators:

'start of iLogic rule - - - - - - - - - - - - - - - - - -

doc = ThisDoc.ModelDocument
 'check file type
If doc.DocumentType = kPartDocumentObject Then
MessageBox.Show("This is a part file.", "iLogic")
Else if doc.DocumentType = kAssemblyDocumentObject Then
MessageBox.Show("This is an assembly file.", "iLogic")
End if
 'end of iLogic rule - - - - - - - - - - - - - - - - - -

 
'start of iLogic rule - - - - - - - - - - - - - - - - - -
doc = ThisDoc.ModelDocument
 'check file type
If doc.DocumentType = kPartDocumentObject Then
'do nothing
Return
Else if doc.DocumentType = kAssemblyDocumentObject Then
'do something
MessageBox.Show("This is an assembly file.", "iLogic")
End if 
'end of iLogic rule - - - - - - - - - - - - - - - - - -


Here is a list of all of the the DocumentType enumerators available in the API:
kUnknownDocumentObject
kPartDocumentObject
kAssemblyDocumentObject
kDrawingDocumentObject
kPresentationDocumentObject
kDesignElementDocumentObject
kForeignModelDocumentObject
kSATFileDocumentObject 
kNoDocument

 Update July 02, 2013
Here is another version of the rule that will report the file type and check to see if a sketch is active. This example rule will report the file type even when editing within another file type. Meaning that if you have a part file active within an assembly, this rule reports that it is a part file.


'start of iLogic rule - - - - - - - - - - - - - - - - - -
Dim oDoc As Document
oDoc = ThisDoc.Document

If oDoc.DocumentType = Inventor.DocumentTypeEnum.kPartDocumentObject  Then
            If Typeof ThisApplication.ActiveEditObject Is Sketch Then
            MessageBox.Show("You have a sketch active in a part file.", "iLogic")
            Else
            MessageBox.Show("This is a part file.", "iLogic")
            End If
Else If oDoc.DocumentType = Inventor.DocumentTypeEnum.kAssemblyDocumentObject Then
            If Typeof ThisApplication.ActiveEditObject Is Sketch Then
            MessageBox.Show("You have a sketch active in an assembly file.", "iLogic")
            Else
            MessageBox.Show("This is an assembly file.", "iLogic")
            End If
Else If oDoc.DocumentType = Inventor.DocumentTypeEnum.kDrawingDocumentObject Then
            If Typeof ThisApplication.ActiveEditObject Is Sketch Then
            MessageBox.Show("You have a sketch active in a drawing file.", "iLogic")
            Else
            MessageBox.Show("This is a drawing file.", "iLogic")
            End If
End If
'end of iLogic rule - - - - - - - - - - - - - - - - - -   

 
Update 5/27/2014
Luke Davenport's blog article "iLogic – Exit Rule Based on File Type"
http://www.cadlinecommunity.co.uk/Blogs/Blog.aspx?ScoId=d94fe4c0-e7d8-49ae-921d-04910a7d9740

Turn On/Off all Workfeatures with iLogic

$
0
0
Issue:
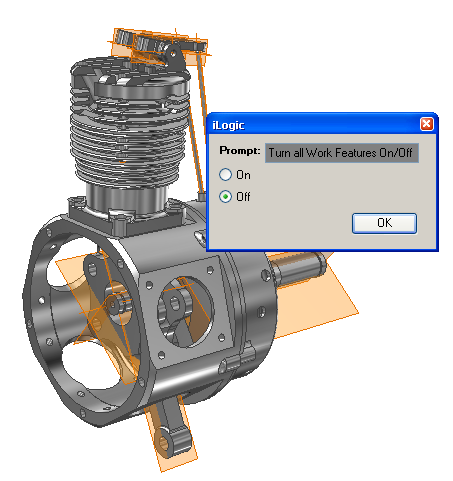
You have other members of your design team that do not remember to turn off work features at the part level or sub-assembly level when they are done working with those files. As a result file previews and view representations get messed up. You'd like to have a quick way to toggle all of the work features off. Can this be done with iLogic?


Solution:
You can use this example iLogic rule to toggle all work features on or off.


'catch and skip errors
On Error Resume Next
'define the active assembly
Dim oAssyDoc As AssemblyDocument
oAssyDoc = ThisApplication.ActiveDocument 

'get user input as True or False
wfBoolean = InputRadioBox("Turn all Work Features On/Off", "On", "Off", False, "iLogic")

'Check all referenced docs
Dim oDoc As Inventor.Document
For Each oDoc In oAssyDoc.AllReferencedDocuments
    'set work plane visibility
    For Each oWorkPlane In oDoc.ComponentDefinition.WorkPlanes
    oWorkPlane.Visible = wfBoolean
    Next
    'set work axis visibility
    For Each oWorkAxis In oDoc.ComponentDefinition.WorkAxes
    oWorkAxis.Visible = wfBoolean
    Next
    'set work point visibility
    For Each oWorkPoint In oDoc.ComponentDefinition.WorkPoints
    oWorkPoint.Visible = wfBoolean
    Next
Next
'update the files
InventorVb.DocumentUpdate()


Ilogic - Add Standard Virtual Parts From a Text File

$
0
0


Issue:
You have a number of standard Virtual parts that you find yourself adding over and over. You'd like to have the ability to add them based on a predefined list.


Solution:
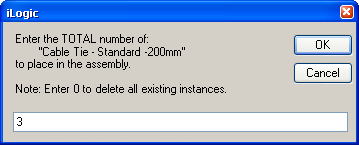
Here is an example iLogic rule that will read a *.txt file and present the contents to the user in an input box list. The user is then asked to enter a quantity for the virtual part, and then the virtual part occurrences are added to the assembly. If one or more occurrences of the virtual part exist in the assembly, the iLogic rule deletes them and just adds back the total number needed.

(update: see also iLogic - Add Standard Virtual Parts From an Excel File or a similar solution)

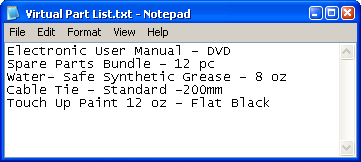
An example text file list

The list presented to the user in an input list box.

 
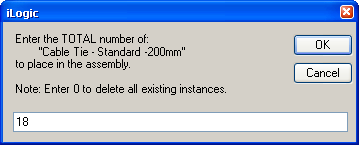
The input box presented to the user to set the quantity.

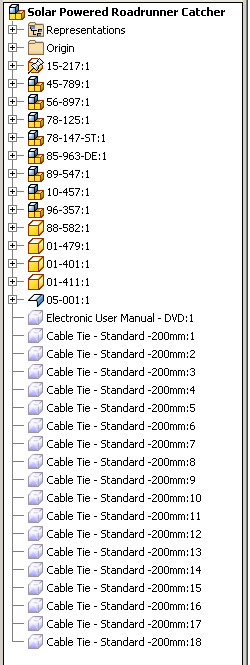
The virtual parts added to the assembly.

Adjusting the quantity.

The iLogic rule deletes the original 18 occurrences and just adds back the number specified.
 Here is the example iLogic rule:
(special thanks to Brian Ekins for the code he posted at this link.)


Imports System.IO
'open and read a text file
Dim oRead As New StreamReader("U:\iLogic examples\Virtual Part List.txt")
Dim sLine As String = ""
Dim MyArrayList As New ArrayList

'build list from text file
Do
    sLine = oRead.ReadLine()
    If Not sLine Is Nothing Then
        MyArrayList.Add(sLine)
    End If
Loop Until sLine Is Nothing
oRead.Close()

'get user input from list
sVirtPart = InputListBox("Select a virtual part to add.", _
MyArrayList, MyArrayList.Item(0), "iLogic", "Standard Virtual Parts")

'check for empty input
'in the case where the user
'cancels out of the input box
If sVirtPart = ""Then
Return 'end rule
Else
End if

'get quantity from user
iQTY = InputBox("Enter the TOTAL number of:"_
& vblf & "        ''"& sVirtPart & "''"_
& vblf & "to place in the assembly."_
& vblf &  vblf & "Note: Enter 0 to delete all existing instances.", "iLogic", "1")

'check for empty input
'in the case where the user
'cancels out of the input box
If iQTY = ""Then
Return 'end rule
Else
End if

'define assembly
Dim asmDoc As AssemblyDocument
asmDoc = ThisApplication.ActiveDocument
'define assembly Component Definition
Dim oAsmCompDef As AssemblyComponentDefinition
oAsmCompDef = ThisApplication.ActiveDocument.ComponentDefinition

'Iterate through all of the occurrences in the assembly
Dim asmOcc As ComponentOccurrence
For Each asmOcc  In oAsmCompDef.Occurrences
                'get name of occurence only (sees only everything left of the colon)
                Dim oOcc As Object
            oOcc = asmOcc.name.Split(":")(0)
            'look at only virtual components
                If TypeOf asmOcc.Definition Is VirtualComponentDefinition Then
                        'compare name selected from list to the
                                'existing virtual parts
                                If oOcc = sVirtPart Then
                        'delete existing virtual parts if name matches
                                asmOcc.delete
                                Else
                        End if
            Else
            End If
Next
  
Dim occs As ComponentOccurrences
occs = asmDoc.ComponentDefinition.Occurrences
  
Dim identity As Matrix
identity = ThisApplication.TransientGeometry.CreateMatrix
 
'create first instance of the virtual part
Dim virtOcc As ComponentOccurrence
if  iQTY >= 1 Then
virtOcc = occs.AddVirtual(sVirtPart, identity)
Else
Return
End if

'add next instance starting at instance2 (if applicable)
Dim index As Integer
index = 2
Do While index <= iQTY
occs.AddByComponentDefinition(virtOcc.Definition, identity)
index += 1
Loop

Inventor HSM Express – The Free CAM Solution for Inventor Users – Beta Invitation

$
0
0
Issue:
You're looking for an integrated CAM solution to use with Autodesk Inventor.


Potential Solution:
Check out the Inventor HSM Express Beta tools.


From the Autodesk CAM Team:
The Autodesk CAM Team has launched the official Public Beta of Inventor HSM Express, a free 2-1/2 Axis CAM solution for Inventor users.

Powered by HSMWorks CAM technology, Inventor HSM Express has all the capabilities of HSMXpress – the Free CAM Solution for SolidWorks and is seamlessly integrated inside the design environment of Autodesk Inventor. This integration allows Inventor users to take advantage of workflow and tools they are used to when programming CNC toolpaths for their 2.5D machining projects.

If you are an experienced Inventor user we could really use your help. Our goal is to have a CAM solution so tightly integrated with Inventor that you don’t perceive any difference when switching between the   modeling environment and the CAM environment. Your feedback is crucial in helping us achieve this goal. And, for those of you with CNC programming experience, we would love to hear your first impressions in working with our new CAM tools.

If you'd like  to participate in our Beta but don’t have Autodesk Inventor you can download a 30-day trial at this link: http://www.autodesk.com/products/autodesk-inventor-family/free-trial

To participate in the Inventor HSM Express Beta and watch a quick preview of Inventor HSM Express, you can visit this link: https://beta.autodesk.com/callout/?callid=22396638F5374AC28E2F1A24CC7EEFA8

Ilogic - Add Standard Virtual Parts From an Excel File

$
0
0
Issue:
You have a number of standard Virtual parts that you find yourself adding over and over. You'd like to have the ability to add them based on a predefined list.

You saw the post about adding these parts from a text file, but you'd like to be able to add standard iProperties for these virtual parts also. This way your Bill of Materials information for the virtual parts can be set when the virtual part is created. So you were wanting to read data from an XLS file that contains all of the information that you typically add for virtual parts.


Solution:
Here is an example iLogic rule that will read a *.xls file and present the contents to the user in an input box list. The user is then asked to enter a quantity for the virtual part, and then the virtual part occurrences are added to the assembly. If one or more occurrences of the virtual part exist in the assembly, the iLogic rule deletes them and just adds back the total number needed.

As the virtual parts are added, the iProperty information found in the *.xls file is added also. 
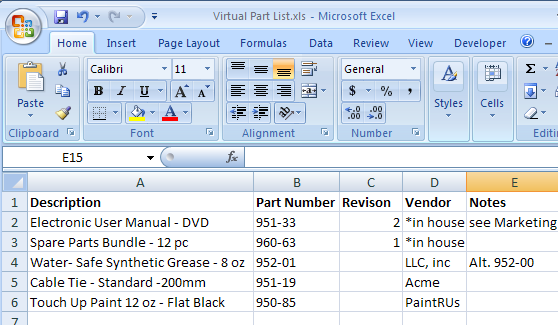
In this example the parts are placed by using the A column, which is the description. Then the other columns are read in and used to populate the virtual part's iProperties.

An example XLS file list with iProperty information.


Dim MyArrayList As New ArrayList
MyArrayList = GoExcel.CellValues("U:\iLogic examples\Virtual Part List.xls", "Sheet1", "A2", "A1000")
Dim sVirtPart As String
'get user input from list
sVirtPart = InputListBox("Select a virtual part to add.", _
MyArrayList, MyArrayList.Item(0), "iLogic", "Standard Virtual Parts")
'check for empty input in the case where the user cancels out of the input box
If sVirtPart = ""Then
Return 'end rule
Else
End if

'get iProperties from the XLS file
For MyRow = 2 To 1000 'index row 2 through 1000
                'find the cell in column A that matches the user selection
                 If sVirtPart = (GoExcel.CellValue("A"& MyRow)) Then
            'get the iProperty from the XLS file for each column
                oProp1 = GoExcel.CellValue("A"& MyRow )
            oProp2 = GoExcel.CellValue("B"& MyRow )
            oProp3 = GoExcel.CellValue("C"& MyRow)
            oProp4 = GoExcel.CellValue("D"& MyRow)
            oProp5 = GoExcel.CellValue("E"& MyRow)
            Exit For
            End If
Next

'get quantity from user
iQTY = InputBox("Enter the TOTAL number of:"_
& vblf & "        ''"& sVirtPart & "''"_
& vblf & "to place in the assembly."_
& vblf &  vblf & "Note: Enter 0 to delete all existing instances.", "iLogic", "1")
'check for empty input in the case where the user cancels out of the input box
If iQTY = ""Then
Return 'end rule
Else
End if

'define assembly
Dim asmDoc As AssemblyDocument
asmDoc = ThisApplication.ActiveDocument
'define assembly Component Definition
Dim oAsmCompDef As AssemblyComponentDefinition
oAsmCompDef = ThisApplication.ActiveDocument.ComponentDefinition

'Iterate through all of the occurrences in the assembly
Dim asmOcc As ComponentOccurrence
For Each asmOcc  In oAsmCompDef.Occurrences
                'get name of occurence only (sees only everything left of the colon)
                Dim oOcc As Object
            oOcc = asmOcc.name.Split(":")(0)
            'look at only virtual components
                If TypeOf asmOcc.Definition Is VirtualComponentDefinition Then
                        'compare name selected from list to the
                                'existing virtual parts
                                If oOcc = sVirtPart Then
                        'delete existing virtual parts if name matches
                                asmOcc.delete
                                Else
                        End if
            Else
            End If
Next
 
Dim occs As ComponentOccurrences
occs = asmDoc.ComponentDefinition.Occurrences
 
Dim identity As Matrix
identity = ThisApplication.TransientGeometry.CreateMatrix

'create first instance of the virtual part
Dim virtOcc As ComponentOccurrence
if  iQTY >= 1 Then
virtOcc = occs.AddVirtual(sVirtPart, identity)
            Try
            iProperties.Value(sVirtPart & ":1", "Project", "Description") = oProp1
                Catch 'catch error when oProp1 = nothing
                End Try
            Try
            iProperties.Value(sVirtPart & ":1", "Project", "Part Number") = oProp2
                Catch 'catch error when oProp2 = nothing
                End Try
            Try
            iProperties.Value(sVirtPart & ":1", "Project", "Revision Number") = oProp3
                Catch 'catch error when oProp3 = nothing
                End Try
            Try
            iProperties.Value(sVirtPart & ":1", "Project", "Vendor") = oProp4
                Catch 'catch error when oProp4 = nothing
                End Try
            Try
            iProperties.Value(sVirtPart & ":1", "Summary", "Comments") = oProp5
                Catch 'catch error when oProp5 = nothing
                End Try
Else
Return
End if

'add next instance starting at instance2 (if applicable)
Dim index As Integer
index = 2
Do While index <= iQTY
occs.AddByComponentDefinition(virtOcc.Definition, identity)
index += 1
Loop


Use 3D Solid Edges for Frame Generator Selection

$
0
0
Issue:
You use the Frame Generator tools in Autodesk Inventor all of the time, but you find that creating the base 3D sketch is tedious, time consuming, and doesn't always take edits well. Is there another way to do this?


Solution:
There are some times when a creating a 3D sketch is required, but often time it's helpful to know that you can use the edges of  a 3D base part to place Frame Generator members. When you select a part edge, Frame Generator automatically projects the geometry into the Frame Reference Model that it creates using the selected edges.

For instance you could create a basic 3D solid part model such as the one shown, and place it into an assembly file:

If you need more edges to use for the frame selection you can edit the base part model, and sketch on the faces of the solid:


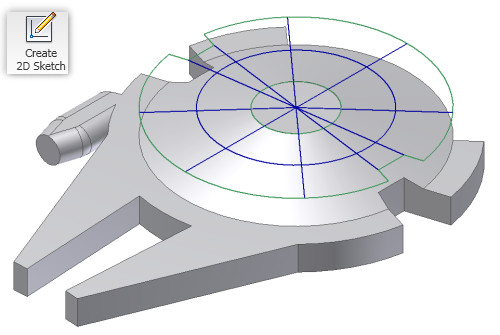
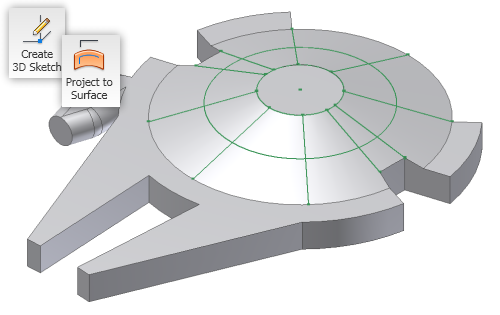
 There are times where you might want to create a 3d Sketch based upon 2D sketch geometry. Here a 3D sketch is created and the 2D sketch is projected to the face pf the part to provide more edges to use in the frame. This is done using the 3D Project to Surface tool:
http://wikihelp.autodesk.com/Inventor/enu/2012/Help/3320-Show_Me_3320/3321-Show_Me_3321/3538-3D_Sket...


Often it's helpful to make the base part a clear color so you can see all of the edges to be used for selection:
 In order to prevent the base model from impacting the mass of your assembly, you can set it to Reference:


 Once you are finished selecting edges, you can just turn off the Visibility setting of the base part file, leaving only the frame showing:

iLogic: How to learn Inventor's Application Programming Interface (API)

$
0
0
Issue:
You've been somewhat successful using iLogic code examples that you find online, but you'd really like to learn how to create your own code from scratch. So how do these other people find the programming calls to create new code? It seems that there is some missing puzzle piece that you can't seem to locate, something that explains how to get started programming in Inventor. Does something like that exist?  


Solution:
Programming in iLogic involves two different methods, that are often mixed together. The first method is to use "native" iLogic functions, the second is to use "raw" API functions by employing Inventor's Application Programming Interface (API).

  • "Native" iLogic functions are a dictionary of automation functions that deliver the power of Inventor's Application Programming Interface (API) to users by using single-line automation functions. So you can think of iLogic as a collection of the more common programming and automation tasks that the developers have "cleaned" up so that users can create some Rule based automation in their design. This mean that the iLogic dictionary is just a simple subset of the larger API collection. 

  • "Raw"API language can be run using the iLogic tools as well, but will require more knowledge of VB.Net based syntax, and more need to declare and define within the code language. To get started with Inventor's Application Programming Interface (API) you can use the following links. 

**********    **********     **********    **********     **********    **********     **********    **********     **********
This paper provides a brief overview of Inventor’s programming interface and illustrates this with examples using iProperties:
VBA & Inventor API Introduction (zip file - 11.2 MB)

**********    **********     **********    **********     **********    **********     **********    **********     **********


**********    **********     **********    **********     **********    **********     **********    **********     **********
The following resource will help you get started with programming Inventor. It assumes familiarity with Autodesk Inventor and general programming concepts:

DevTV: Introduction to Inventor Programming, a self-paced video tutorial demonstrating how to get started developing with Autodesk Inventor.
View online | Download (zip file- 51.8 MB)
**********    **********     **********    **********     **********    **********     **********    **********     **********


**********    **********     **********    **********     **********    **********     **********    **********     **********
The links above as well as additional information concerning the Autodesk Developer Network resources, can be found at this link:

http://usa.autodesk.com/adsk/servlet/index?id=1079044&siteID=123112

**********    **********     **********    **********     **********    **********     **********    **********     **********

Hybrid Wireframe and Shaded Views in Autodesk Inventor

$
0
0


Issue:
You want to create a view on your drawing that has some parts shaded and some that look wire-framed, so you can show some particular detail of your assembly in your detailed drawing.


In the past you could do it as described in tip #1 at this link, but that seems not to work now.
http://inventortrenches.blogspot.com/2011/06/autodesk-inventor-tips-from-around-web.html

Solution:
Here is another way to do this.

  • Create one new Positional Representation ( no need to do anything else with it, other than creating it).
  • Create 2 View Representations
  • In View Representation 1, turn off the visibility of the part you want to show wireframe
  • In View Representation 2, turn off the visibility of everything else
  • Create a drawing Base View and set it to use View Representation 2
  • Create an Overlay View, and set it to use the Positional Representation and View Representation 1
  • In the Overlay View dialog box set the style to be not shaded & hidden lines removed
  • And also in the Overlay View dialog box set the Layer dropdown to be 'As Parts'.


  • Here's a link to a quick video.


    iLogic - Dynamic MultiValue Parameter Lists "Filtered" By Current Selected Value

    $
    0
    0
    Issue:
    You want to "filter" a list (List B) based on the selection from another list (List A), but the lists are long and writing the If/Then or Select Case statements are repetitive, and difficult to maintain. Is there a better way?

    Solution:
    You can use ArrayLists and For Each Statements to do this, as shown in this example.

    Here an illogic form is used, and when a value is selected from List A, then List B and C are reset to include only values less than or equal to the current selected List A value.


    Example file:
    Dynamic MultiValue Lists iLogic 2015.ipt ‏68 KB    

    SyntaxEditor Code Snippet
    Example code:

    'reset List B list to default
    MultiValue.SetList("List_B", 1,2,3,4,5,6,7,8,9,10,11,12,13,14,15,16)

    'reset List C list to default
    MultiValue.SetList("List_C", 2,4,6,8,10,12,14,16)

    DimB_ListAsNewArrayList
    B_List=MultiValue.List("List_B")

    DimC_ListAsNewArrayList
    C_List=MultiValue.List("List_C")

    DimTemp_ListAsNewArrayList

    Temp_List.Clear
    ForEachoIteminB_List
    IfList_A>=oItemThen
    Temp_List.Add(oItem)
    EndIf
    Next

    MultiValue.List("List_B")=Temp_List

    Temp_List.Clear
    ForEachoIteminC_List
    IfList_A>=oItemThen
    Temp_List.Add(oItem)
    EndIf
    Next

    MultiValue.List("List_C")=Temp_List

    iLogic: Select and Set Sketch Dimension Tolerances

    $
    0
    0


    Issue:
    You want to to quickly select and set standard tolerances for your sketch dimensions.


    Solution:
    Here is a quick routine written for iLogic using the API to do this. This employs the CommandManager's Pick function to allow you to select individual dimensions and set the tolerance.

    Thank you! to Ron Moore, for the question/post idea.


    oMsg = "Select sketch dimensions to apply default tolerance (Press Esc to continue)"

    WhileTrue

            DimoDimensionAsDimensionConstraint

            oDimension= ThisApplication.CommandManager.Pick(

            SelectionFilterEnum.kSketchDimConstraintFilter, oMsg) 

            ' If nothing gets selected then we're done   

            IfIsNothing(oDimension) ThenExitWhile 

            oDimension.Parameter.Tolerance.SetToSymmetric(0.05)

    EndWhile


    Inventor API: using UnitsOfMeasure.ConvertUnits

    $
    0
    0

    Issue:

    You're writing a bit of code that might be used in Inventor documents of varying unit types. For instance maybe this code is sometimes used in inch based parts, other times it's used in millimeter based parts, and sometime centimeter based parts. Or maybe the part has some dimensions entered in inches and some entered in millimeters. In any case you want your code to handle all of this.


    Recall that when we work with the API, inventor returns values in its internal units, which is always centimeters. So we often need to have our code apply a conversion factor. 

    Because of this you want the code to detect the units and do the conversion automatically.

    Note:
    If we're working with straight iLogic and no API calls, then the conversion is *often* handled for us internally in the iLogic function.    

    *I won't say always*


    Solution:
    Below is a quick example that you can use to do the units detection and conversion in your code.

    Here is the basic function. It uses the document's length units and centimeters to determine the conversion factor, and displays this in a message box to return the conversion factor.


    DimoUOMAsUnitsOfMeasure
    oUOM = ThisDoc.Document.UnitsOfMeasure
    oLenUnits = oUOM.GetStringFromType(UnitsTypeEnum.kDefaultDisplayLengthUnits)
    oInvUnits = UnitsTypeEnum.kCentimeterLengthUnits
    oInvUnitString = oUOM.GetStringFromType(oInvUnits)
    oConversion = oUOM.ConvertUnits(1, oUOM.LengthUnits, oInvUnits)

    MsgBox("Document Units = "& oLenUnits& vbLf& _
    "Inventor Internal Units = "& oInvUnitString& vbLf& _
    "Conversion factor = "& oConversion, , "Inventor")


    And here is a quick example using it to return the value of a selected sketch dimension.
    This part is set to inches (Tools tab > Document Setting button > Units tab > Length setting)


    Here a sketch dimension/parameter named length is set to 70 mm, even though the part file is using Inches. And because our code is using the API to get the parameter value, we know that it's going to be returned in centimeters. 


    Without the conversion factor, the code returns 7, which is the value in Inventor's internal units of centimeters.


    So we use the UnitsOfMeasure.ConvertUnits function to handle all of this and return the expected value in the document units. 


    With the conversion code, it returns 2.756, which is the value in inches.


    Here's the working example:
    DimoUOMAsUnitsOfMeasure
    oUOM = ThisDoc.Document.UnitsOfMeasure
    oConversion = oUOM.ConvertUnits(1, oUOM.LengthUnits, _
    UnitsTypeEnum.kCentimeterLengthUnits)

    oMsg = "Select a sketch dimension(Press Esc to continue)"

    WhileTrue
    DimoDimensionAsDimensionConstraint
    oDimension = ThisApplication.CommandManager.Pick(
    SelectionFilterEnum.kSketchDimConstraintFilter, oMsg)

    ' If nothing gets selected then we're done
    IfIsNothing(oDimension) ThenExitWhile
    oParam = oDimension.Parameter
    oParamVal = Round(oParam.Value() / oConversion, 3)

    MsgBox(oParamVal,,"Inventor")
    EndWhile

    iLogic: Custom Sort PartsList with Temporary Column

    $
    0
    0


    Issue: 

    You have a parts list that has a challenging sort criteria, due to needing to sort for values that might or might not exist in the same column. 

    In the example above we want to sort the description column based on all items with a mark number (MK) value, and then sort those without a mark number alphabetically.


    Solution:

    Although we can't accomplish this out of the box, here is a code example to this that using iLogic and some API calls.


    sSortColumnName = "KEYWORDS"

    ' Set a reference to the drawing document.
    ' This assumes a drawing document is active.
    DimoDrawDocAsDrawingDocument
    oDrawDoc = ThisApplication.ActiveDocument

    ' Set a reference to the first parts list on the active sheet.
    DimoPartsListAsPartsList
    Try
    oPartsList = oDrawDoc.ActiveSheet.PartsLists.Item(1)
    Catch
    Return'exit rule
    EndTry

    DimoADocAsAssemblyDocument
    oADoc = oPartsList.ReferencedDocumentDescriptor.ReferencedDocument
    DimoPropSetAsPropertySet
    oPropSet = oADoc.PropertySets.Item("Inventor Summary Information")

    'add temporary column to the parts list
    oID = oPropSet.Item(sSortColumnName).PropId
    Try
    oPartsList.PartsListColumns.Add _
    (PropertyTypeEnum.kFileProperty, oPropSet.InternalName, oID)
    Catch
    EndTry

    ' Iterate through the contents of the parts list.
    DimiAsLong
    Fori = 1 TooPartsList.PartsListRows.Count

    'get the Description value
    oCell = oPartsList.PartsListRows.Item(i).Item("DESCRIPTION")

    'split the string at the comma
    'expecting a string like:
    ' Bracket, MK B-114
    sArray = Split(oCell.Value, ",")
    sType = sArray(0)

    Try
    sMK = sArray(1)
    Catch'error when no comma in string
    sMK = ""
    EndTry


    'get the temp column cell
    oTempColumnCell = oPartsList.PartsListRows.Item(i).Item(sSortColumnName)

    'write to temp column
    IfsMK.Contains("MK") Then
    'strip off the MK
    sMK = Replace(sMK, "MK ", "")
    oTempColumnCell.Value = sMK
    Else
    oTempColumnCell.Value = sType
    EndIf
    Next

    'sort and renumber
    oPartsList.Sort(sSortColumnName)
    oPartsList.Renumber
    'remove temp column
    oPartsList.PartsListColumns(sSortColumnName).remove

    Traverse Assembly to Turn Off all Work Features and Sketches with iLogic

    $
    0
    0


    Issue:
    An update to an older post on this topic:
    http://inventortrenches.blogspot.com/2013/03/turn-onoff-all-workfeatures-with-ilogic.html

    Solution:
    You can use this example iLogic rule to traverse the assembly (and subassemblies) to turn off all work features and sketches.


    SubMain

    DimoDocAsAssemblyDocument = ThisApplication.ActiveDocument
    DimoOccsAsComponentOccurrences = oDoc.ComponentDefinition.Occurrences

    DimsNameAsString
    sName = oDoc.DisplayName

    'set vis in the top level
    CallSetVis(oDoc, sName)

    CallTraverseAssembly(oOccs)

    EndSub

    SubTraverseAssembly(oOccsAsComponentOccurrences)

    DimoOccAsComponentOccurrence
    ForEachoOccInoOccs

    DimoDocAsDocument
    oDoc = oOcc.Definition.Document

    DimsNameAsString
    sName = oOcc.Name

    'set vis in the component
    CallSetVis(oOcc.Definition.Document, sName)

    'if sub assembly step into it's Occurrences collection
    IfoOcc.DefinitionDocumentType = _
    DocumentTypeEnum.kAssemblyDocumentObjectThen
    Logger.Info("Stepping into: "& sName)

    oSubOccs = oDoc.ComponentDefinition.Occurrences
    CallTraverseAssembly(oSubOccs)
    EndIf
    Next

    EndSub

    SubSetVis(oDocAsDocument, sNameAsString)

    DimoDefAsComponentDefinition
    oDef = oDoc.ComponentDefinition


    ForEachoItemInoDef.Workplanes
    Try
    oItem.visible = False
    Catch
    Logger.Info("Could not set work plane vis for: "& sName)
    EndTry
    Next

    ForEachoItemInoDef.WorkAxes
    Try
    oItem.visible = False
    Catch
    Logger.Info("Could not set work axis vis for: "& sName)
    EndTry
    Next

    ForEachoItemInoDef.WorkPoints
    Try
    oItem.visible = False
    Catch
    Logger.Info("Could not set work point vis for: "& sName)
    EndTry
    Next

    ForEachoItemInoDef.Sketches
    Try
    oItem.visible = False
    Catch
    Logger.Info("Could not set sketch vis for: "& sName)
    EndTry
    Next

    EndSub

    iLogic Rule to Update Drawing Resources

    $
    0
    0


    iLogic Copy Drawing Resources Autodesk Inventor


    Issue:
    You have drawings that you want to update with a new border, title block, sketch symbol or other Drawing Resource item.

    Solution:
    Here is a quick iLogic rule to do this.


    oBorderName = "My Border"
    oTitleBlockName = "My Title Block"
    oSymbolName = "My Symbol"

    oResourceFile = "C:\Temp\MyDrawingResourceFile.idw"

    'open source file
    DimoSourceFileAsDrawingDocument
    oSourceFile = ThisApplication.Documents.Open(oResourceFile, False)

    DimoDocAsDrawingDocument
    oDoc = ThisDoc.Document

    'copy the resources from the source file, replace existing
    oSourceFile.BorderDefinitions.Item(oBorderName).CopyTo(oDoc, True)
    oSourceFile.TitleBlockDefinitions.Item(oTitleBlockName).CopyTo(oDoc, True)
    oSourceFile.SketchedSymbolDefinitions.Item(oSymbolName).CopyTo(oDoc, True)

    'close source file
    oSourceFile.Close(True)


    iLogic : Set View Scale from Standard Preset Set List

    $
    0
    0

     Issue:

    You would like to set the view scale of your drawing views using the predefined scale list as found at Manage tab > Styles Editor button > Standard > Standard name> General tab > Preset Values> Scale


    Solution:

    Here is a quick bit of code to get this list and set the scale based on the scale selected from the input list box.

    ( Thank you! to Zach B. for the idea for the rule) 


    DimoDocAsDrawingDocument = ThisApplication.ActiveDocument
    DimoStyleManagerAsDrawingStylesManager = oDoc.StylesManager

    DimoActiveStandardAsDrawingStandardStyle
    oActiveStandard = oDoc.StylesManager.ActiveStandardStyle

    DimoListAsNewList(OfString)
    ForEachoItemInoActiveStandard.PresetScales
    oList.Add(oItem)
    Next

    DimoViewAsDrawingView
    oCurrentScale = oDoc.ActiveSheet.DrawingViews.Item(1).ScaleString

    DimoScaleAsString = InputListBox("Select a scale", _
    oList, oCurrentScale, "iLogic", "Standard Scale List")

    IfString.IsNullOrWhiteSpace(oScale) ThenExitSub

    ForEachoViewInoDoc.ActiveSheet.DrawingViews
    IfoView.ScaleFromBase = FalseThen
    oView.ScaleString = oScale
    EndIf
    Next


    Autodesk University 2023: Bridging the Gap Between iLogic Automation and Inventor Add-Ins, MFG601910

    Open Drawing From Balloon

    $
    0
    0


    Issue:

    You'd like to be able to open a component drawing by selecting a balloon from an assembly drawing.

    Solution:

    Here is an iLogic rule that uses a bit of API code to do this.


    DimoDocAsDrawingDocument = ThisApplication.ActiveDocumentWhileTrue'select BalloonDimoBalloonAsBalloon = NothingoBalloon = ThisApplication.CommandManager.Pick _
    	(SelectionFilterEnum.kDrawingBalloonFilter, _
    	"Select a balloon to open it's drawing. "& " (press ESC To Exit selection)")
    
    	IfIsNothing(oBalloon) ThenExitWhileDimoLeaderAsLeaderIfoBalloonIsNotNothingThenoLeader = oBalloon.LeaderDimoLeaderNodeAsLeaderNode = oLeader.AllNodes(oLeader.AllNodes.Count)
    	DimoIntentAsGeometryIntent = oLeaderNode.AttachedEntityDimoCurveAsDrawingCurve = oIntent.GeometryDimoOccAsComponentOccurrence = oCurve.ModelGeometry.ContainingOccurrenceDimoRefDocAsDocument = oOcc.Definition.DocumentDimoFilePathAsString = oRefDoc.FullFileName()
    	DimoDrawingFilePathAsString = Left(oFilePath, Len(oFilePath) -3) & "idw"TryoDrawDoc = ThisApplication.Documents.Open(oDrawingFilePath, True)
    		ExitWhileCatchMsgBox("Could not open "& oDrawingFilePath, , "iLogic")
    	EndTryEndWhile

    Hacking the Inventor startup screen

    $
    0
    0

     Autodesk has been wiping out old forum posts ( thousands of them 😠 ) so when I ran across this today, I thought I'd back it up here, so that we won't loose it in the next couple of years.


    Credit to Pball for the instructions below. 

    This was originally written for Inventor 2017, I'm assuming it still works for current versions.

    Use at your own risk, and all that jazz.

    Original link:

    https://forums.autodesk.com/t5/inventor-forum/silly-splash-screens/m-p/6774798#M625213


    Here are some instructions for changing the splash screen.


    I personally use Resource Hacker to modify icons and other resources in executables and dlls. http://www.angusj.com/resourcehacker/#download


    Fire up resource hacker and open C:\Program Files\Autodesk\Inventor 20xx\bin\BrandRes.dll, changing 20xx for whichever version you might use


    Navigate to the bitmap folder in the treeview and select the 108 entry which is the splash screen image


    reshack1.png


    Then click Action and choose Save *.bmp resource and save the bitmap image somewhere


    Either edit the saved image or create a new bmp with the same size and properties as the original


    The click Action and choose Replace Bitmap, make sure the 108 splash screen entry is selected on the right side of the dialog and use the open file with new bitmap to select the replacement image and hit the Replace button


    Hit save to save the edited dll file. (If you get an error either the file is being accessed and you need close inventor or you might need admin permissions to edit that file, save a copy of the file somewhere else and try to manually rename BrandRes.dll and copy the edited one over)


    Resource Hacker will create a back up of the original file if you don't run into permission issues


    Now you have a custom splash screen


    <script src="https://jsc.adskeeper.com/r/s/rssing.com.1596347.js" async> </script>